¶ Pre-Requisites
You need the following software installed on your computer (or access to the Valor Render Box which has the software pre-installed):
- Cura - Download Link
¶ Basics
The Ender 3 printer should be used for basic 3D printing such as spacers, light supports, or prototype parts. For more complicated and reliable parts, see the section on the MarkForged 3D printer.
¶ 3D printer "desired fit"
This section details the measurements needed to achieve your "desired fit", or as you may here us in the shop say: Tolerancing.
| Desired Fit | Clearance Gap (in) | Clearance Gap (mm) |
|---|---|---|
| Press Fit | 0 | 0 |
| Tight Fit | 0.005 | 0.127 |
| Normal Fit | 0.01 | 0.254 |
| Loose Fit | 0.02 | 0.508 |
Please make sure that any holes you have in your CAD model have the appropriate fit to them before printing! We have lost so much time printing useless 3D prints because a bolt could not fit through a hole. The reason? In CAD, the bolt had a press fit instead of a normal or loose fit. Verify the appropriate clearance gap exists in your parts before printing.
¶ Exporting from OnShape
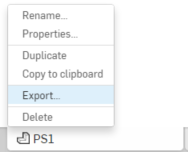
Any part existing in an OnShape document can be exported to be 3D printed. When you export from onshape, right click on a part in the part studio or assembly and click "Export"
You should export an STL with Millimeters as the unit. Cura works in millimeters, even though our OnShape documents are in inches.
¶ Slicing
Slicing is the process of converting a CAD model into G-Code, which is executable code for CNC machines and 3D printers.
For more information on G-Code, see: https://reprap.org/wiki/G-code
Valor uses Cura as our go-to slicing software. If you are installing Cura on your own computer, watch the following video for a quickstart on how to setup a printer, and how to edit your slicing configuration.

Regardless of if you are installing Cura on your own computer, or using the Valor Render Box in the shop, verify that the printer you are using matches the following setup:
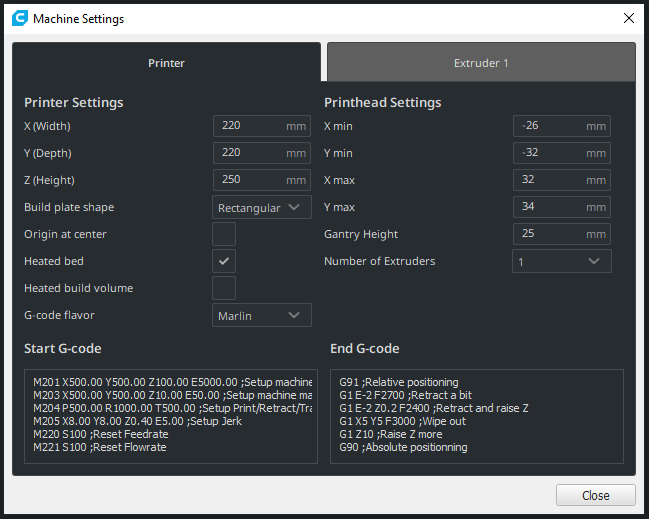
Please use the following slicing configuration as a starting point: valor_ender3.curaprofile
If you are printing a part that has overhangs, requires additional slicing configurations, or seems a little more tricky than the common part, please see the Advanced section below for more details on additional setup.
¶ Printer Preparation
Verify the following 2 pieces of equipment are plugged into the wall and on:
- Ender 3 Printer - Plugged in, and red switch on the side is clicked on
- Octoprint Server - Raspberry Pi computer plugged in
With a glue stick (there is a grey toolbox underneath the 3D printer table that contains glue sticks), gently coat the print bed with a layer of glue. You only need to coat the parts of the bed that will be printed on. If you are unsure, cover the entire bed.
¶ Printing
The Valor Ender3 Printer is available here: https://ender.valor6800.com/
The site is username/password protected - message a mentor to obtain the username/password.
After exporting your G-Code from Cura, you can upload the file to the printer and start the print!
¶ Advanced
You most likely will need some understanding of the items below before you can start printing. Modifying the items below will yield better results and your prints will come out significantly better.
¶ Slicing Configuration
The slicing configuration can make or break your print. The sections below detail some additional settings that you may want to mess with before you print. Keep in mind you should always use the provided slicing configuration as a starting point (valor_ender3.curaprofile) and modify settings after you have imported that profile.
¶ Layer Height
The thickness of each layer of the print. Commonly known as "print resolution" or "print quality". Usually is a multiple of 0.04mm
0.2mm is the default layer height, and the recommended layer height for most FRC applications. It doesn't look the prettiest, but it is quick and durable.
0.12mm is the layer height you should use if you are trying to print with fine details. Keep in mind that by printing at 0.12mm, it is almost half the height of the traditional 0.2mm. This means that it will take almost twice as long, but will have twice the resolution.
Only use this in FRC if you are printing something very tiny that has intricate details. Our recommendation is that if you are printing something at 0.12mm for FRC, you may want to look into using the Markforged instead.
¶ Supports
Supports are areas of the print that get peeled off and thrown out after the print is complete. They are used to support parts of the print that would normally fall over, or that are in mid-air
Most of the time you don't need supports. Even on some overhangs that potentially would be printing in mid-air, an Ender 3 will be able to make it work.
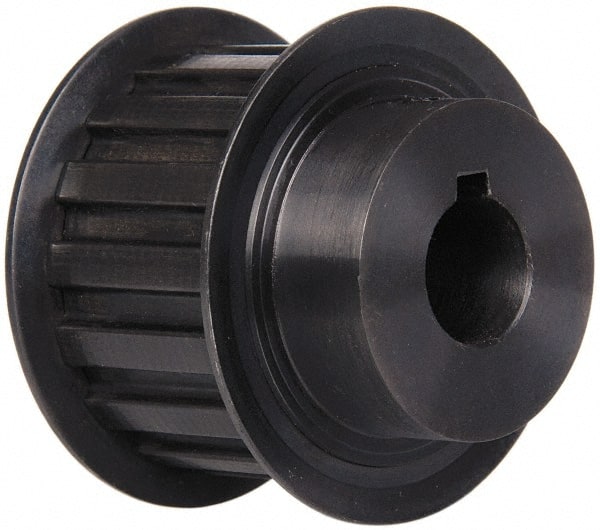
The most common mis-conception is that a pulley needs support. That is not the case (although supports could be used, but use with caution). By printing a pulley with supports, you are making it very difficult for the user (aka. yourself!) to remove the support material after the print. In previous seasons, we have printed pulleys with support material and damaged the pulley while trying to remove the supports.
The overhang on a pulley is so small, that an Ender-3 is able to print without supports just fine. It'll save you some time post-print.
For prints that require support material (very large overhangs), then simply turn on supports and leave the default settings in Cura.
Make sure you turn on the Touching Buildplate only option instead of Everywhere. This is because if you leave the Everywhere setting on, then the Ender 3 will print support material inside of clearance or bearing holes. This makes it very difficult to insert bolts or bearings into those holes later as you will have to remove the support material after printing, which isn't easy to do. Touching Buildplate only guarentees that only the overhang has support, and will be easier to post-process.
¶ Build Plate Adhesion
Build plate adhesion specifies what kind of initial layer gets printed. There are 3 options for build plate adhesion:
A skirt is a small amount of filament that gets printed around your part about an inch away. This is to clear out any bad filament that has been sitting inside the extruder of the 3D printer. Say the 3D printer sat in the lab for the entire summer, a lot of moisture may have affected the end of the filament that will soon be printed. A skirt will extrude that extra bad filament before printing your part to make sure you are only using good filament

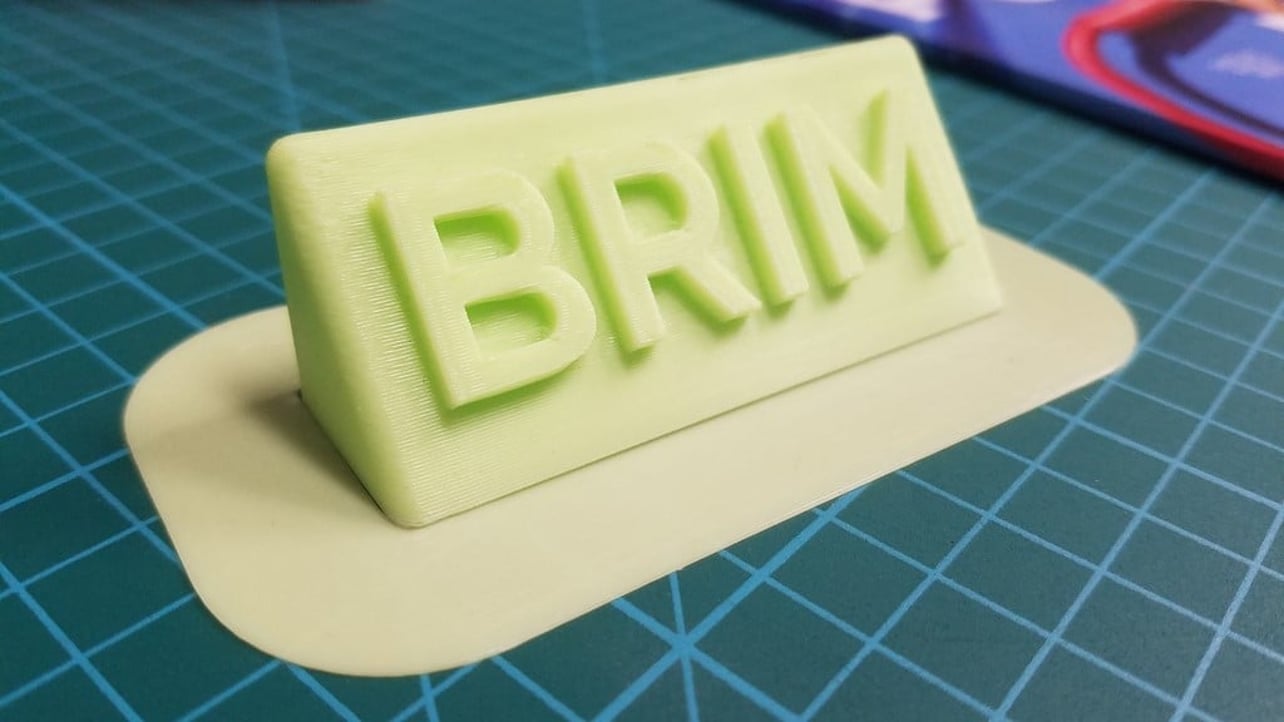
A brim is a small amount of filament that gets printed around your part, but it is touching your part instead of an inch away (like the skirt). Using a brim does the same thing as a skirt, except it also allows supports to print nicely.
If you are using supports, make sure to turn on brim! Supports require less filament to print, so printing straight onto the build platform sometimes is an issue (especially if there isn't a whole lot of glue on the bed). Having a brim allows the support material to bond nicely to other plastic (aka the brim) and will reduce the risk of support material coming "unstuck" later in the print.
Do not use this option. Raft is a waste of filament... use a brim instead, it is practically the same thing!
¶ Quiz
- You need to print a spacer at the school's 3D printer. What software should you open on the Render box?
- A part you are printing requires support material. What kind of build adhesion should you use to print?
- You need to print a pulley. Should you use support material? (Multiple may apply)
- 10 spacers are required for the drive-train transmission. What layer height should you use?
- When exporting an STL from OnShape, what unit should you export the file as?
- Check all that apply. Before printing, verify: